This post may contain affiliate links to products on amazon.com. When you click one of these links and make a purchase, I will receive a small commission, at no cost to you, that enables me to continue providing free recipes. Thank you!
Showing posts with label Sugar-Free. Show all posts
No-Bake Cheesecake - Low Carb, Sugar Free
My dad requested cheesecake for dessert on Thanksgiving this year. I was happy to oblige, but our chickens have not been laying many eggs and I didn't have enough for my usual cheesecake recipe. I ended up tweaking Briana's No-Bake Cheesecake from her cookbook Necessary Food (If you are into low-carb cooking, THM, Keto, etc. then I highly recommend this cookbook) and it was a hit! Definitely not the same texture as regular baked cheesecake, but it tasted great.
No-Bake Cheesecake - Low Carb, Sugar Free
Crust:
3 T Butter
1 T Gentle Sweet, or your sweetener of choice (Swerve, Pyure, Erythritol, etc.)
1 cup Almond Flour
2 T Oat Fiber
Mix crust ingredients thoroughly and press into the bottom of a pie plate. If your butter is cold, you'll need to warm or melt it. Mine was room temp and it blended right up.
Cheesecake:
2 8oz pkgs Cream Cheese
2/3 cup Sour Cream
2 T Lemon Juice
1 tsp Vanilla
4 T Gentle Sweet or sweetener of choice, to taste
4 tsp Great Lakes Gelatin (the red can)
3 T Hot Water
2/3 cup Heavy Cream
Beat cream cheese, sour cream, lemon juice, vanilla, and sweetener until thoroughly combined. It would be easier if the cream cheese was not cold, but I never mange to think ahead enough to set it out so I just rely on my Kitchen Aid mixer to beat the cream cheese. Be sure to scrape the sides of the bowl well with a spatula so it's all combined.
Dissolve the gelatin in hot water, then add to cheesecake mixture and beat well. Add heavy cream and mix for a few more minutes. Give it a taste to see if it's sweet enough - if not, add another tablespoon of sweetener, mix, and taste again.
Pour cheesecake mixture over crust and refrigerate at least an hour, or longer if you can. I was able to cut and serve this after just about an hour but it gets firmer if it can chill longer. Serve with toppings of choice - we had 1 fruit and 2 chocolate ganache here. :)
Labels:
Cheesecake,
Dessert,
Gluten-Free,
Holiday,
Low Carb,
Sugar-Free,
THM S
Spinach Ricotta Bites
I found this recipe on Weelicious YEARS ago and I still make it regularly. It's one of my favorite breakfasts and snacks. My daughter will eat them too, which is a huge win. I get 24 minis but you can also make it in a regular muffin tin and have larger servings, just adjust cooking time accordingly.
Spinach Ricotta Bites
2 Tbsp Butter
1 Small Yellow Onion, chopped
1 Garlic Clove, minced
2 Large Eggs, Beaten
1 Cup Ricotta Cheese
1/2 Cup Mozzarella Cheese, shredded
1/2 Cup Parmesan Cheese, Grated
1 10 Oz Pkg Frozen Chopped Spinach, defrosted and drained, or you can cook fresh spinach in with the butter and onions and then drain it
1/4 Tsp Salt
1. Preheat oven to 350 degrees.
2. Melt the butter in a sauté pan over medium heat and cook the onions for 4 minutes until tender.
3. Add the garlic and cook an additional minute then set aside to cool.
4. Whisk eggs in a bowl and stir in ricotta, mozzarella and parmesan cheeses.
5. Once combined, stir in spinach, salt and cooled onion and garlic mixture.
6. Pour the mixture into lightly greased mini muffin cups.
7. Bake for 20-25 minutes or until the filling is set and golden on top.
8. Serve.
Labels:
Breakfast,
Eggs,
Freeze Ahead,
Gluten-Free,
Greens,
Kids,
Leftovers,
Low Carb,
Lunch,
Snack,
Sugar-Free,
THM S,
Vegetables
Sugar-Free Marble Cheesecake
My dad made this cheesecake and it is fantastic! He said it's important to taste the batter before you pour it, to make sure it's sweet enough. This recipe shows exactly what he did so hopefully it will turn out as good for you as it did for him.
Sugar-Free Marble Cheesecake
Preheat oven to 350.
For crust:
1 cup Pecans, chopped
1/2 cup Walnuts, chopped
1/8 cup Erythritol
2 Tbsp Butter, melted
Process all ingredients in a food processor and mix until well blended. Press into the bottom of a springform pan. It will be very thin.
Bake at 350 degrees for 5 minutes. Cool.
For filling:
2 8oz pkgs Cream Cheese, at room temperature
1 cup Erythritol
1 tsp Salt
1 ½ tsp Vanilla
1 tsp Lemon Juice
16 oz Sour Cream
3 Eggs, at room temperature
Beat all ingredients, except the eggs, with an electric mixer until creamy. Add eggs one at a time until blended.
Reserve one cup of batter for marbling. Pour the rest into the springform pan.
Add 1 tsp Cocoa Powder and about 1/4 cup Erythritol or Xylitol (to taste) to the reserved batter. Spoon chocolate batter onto plain batter and drag a knife through to make a marbled pattern.
Place a pan with a couple of cups of water in it on the lower rack, underneath the rack where you will place your cheesecake. Bake cheesecake at 350 for 1 hour, then turn off the oven and leave the cheesecake in for one more hour before removing it.
Let it cool, and then refrigerate at least two hours until completely chilled.
Labels:
Cheesecake,
Chocolate,
Dessert,
Gluten-Free,
Holiday,
Kids,
Low Carb,
Sugar-Free,
THM S
Strawberry Vinaigrette

I like salad ok, but I don't eat naked salad. I really prefer creamy dressings like Ranch or Creamy Garlic or Blue Cheese, but sometimes I feel like I should go lighter. I came up with a delicious strawberry vinaigrette that is great on any kind of salad, especially spinach. Throw on some sliced hardboiled egg and it's a fantastic lunch.
Strawberry Vinaigrette
1 lb strawberries, hulled (frozen is fine, just thaw partially)
1/4 cup apple cider vinegar
Juice of one lemon
15 drops Liquid Stevia, or other sweetener of choice, if desired
Blend all ingredients. Adjust amounts for your own taste, of course.
Labels:
Gluten-Free,
Salad,
Sugar-Free,
THM S
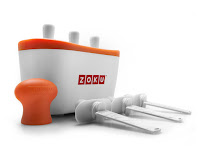
Review: Zoku Quick Pop Maker
Verdict: We love it!
We are huge fans of popsicles. They are often a daily treat in our house, especially in the summer. I love to make them for my kids, since I can sneak in hidden veggies, and of course I know there is no food coloring or artificial sweeteners in my homemade pops.
This summer I have slacked on my smoothie/pop making and bought popsicles from the grocery store that were just fruit and sugar, but decided to get back to the homemade kind when they ran out for the last time.
I decided to splurge on this new little toy to get everyone excited about homemade pops again (and ease the pain of Mom saying no more from the store!)
I washed it and stuck it in the freezer the day it came, so we could get started on our pops first thing in the morning. The kids weren't even out of their pajamas before we were starting our popsicle project.
The most important step is preparing all of the ingredients you want. Once you take the Zoku out of the freezer, the clock is ticking and you must get your ingredients in there quickly if you want any chance of making multiple batches before it's defrosted too much.
The booklet says you can use the pop maker 3 times before refreezing, but I think the only way that would be possible is if you were just pouring a single juice in and letting it go. Adding fruit or making layers significantly increases the time it takes and you are lucky to get two batches done - no way three is happening for fancy pops.
For our first round, we decided to make three different pops, since we don't start out easy with anything around here. I would recommend starting out simple and then adding more complicated plans once you get the hang of it.
Here are all of our ingredients ready to go:
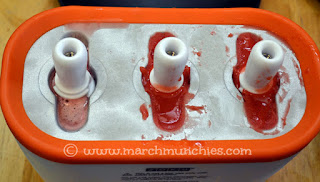
And our Zoku full and freezing:
1. Watermelon Pops with Blueberries
I blended the watermelon and then strained it so it would be just liquid, no pulp. After the stick was seated in the Zoku, I dropped a few blueberries on either side and poured the watermelon juice in to the fill line. Super easy and it came out perfect! My kids devoured it in no time. We didn't feel it needed any sugar or anything as the watermelon was very sweet by itself.
2. Strawberry with sliced Strawberry and Banana
In the Vitamix, I blended frozen strawberries with honey and a little water. I recommend not using frozen strawberries, because I ended up having to blend for a long time to get it liquidy enough to pour easily. The Zoku requires very thin liquid so you can't make a thick smoothie and expect to be able to pour it around the stick and the fruit. So thaw your fruit first - it'll be easier to blend anyway.
Insert just a couple of pieces of thinly sliced fruit into the Zoku and insert the stick all the way so it's seated properly. We put a sliced strawberry on one side and a couple of slices of banana on the other side. Then pour the strawberry puree in to the fill line.
This one came out great as well!
3. Strawberry Swirled with Yogurt
I used a homemade yogurt that is very thin, so it poured well. If your yogurt is thick, I recommend thinning it with some milk or cream so that it will pour easily. It should be sweet - I used honey to sweeten it since it was plain.
For this one, I poured some of the strawberry puree into the Zoku and waited about 2 minutes for it to harden up a little but not all the way. The I poured in some yogurt in and left it for about 3 minutes. Then I filled it the rest of the way with strawberry. I tipped the Zoku back and forth a little so the layers would swirl but not mix completely.
The yogurt took longer to freeze than the fruit only, but it was pretty easy to tell since the stick was wiggly long after we had removed the other two. Once the stick was firm in the pop the whole thing came out easily.
The possibilities are endless! What else should we try in our Zoku?
We are huge fans of popsicles. They are often a daily treat in our house, especially in the summer. I love to make them for my kids, since I can sneak in hidden veggies, and of course I know there is no food coloring or artificial sweeteners in my homemade pops.This summer I have slacked on my smoothie/pop making and bought popsicles from the grocery store that were just fruit and sugar, but decided to get back to the homemade kind when they ran out for the last time.
I decided to splurge on this new little toy to get everyone excited about homemade pops again (and ease the pain of Mom saying no more from the store!)
I washed it and stuck it in the freezer the day it came, so we could get started on our pops first thing in the morning. The kids weren't even out of their pajamas before we were starting our popsicle project.
The most important step is preparing all of the ingredients you want. Once you take the Zoku out of the freezer, the clock is ticking and you must get your ingredients in there quickly if you want any chance of making multiple batches before it's defrosted too much.
The booklet says you can use the pop maker 3 times before refreezing, but I think the only way that would be possible is if you were just pouring a single juice in and letting it go. Adding fruit or making layers significantly increases the time it takes and you are lucky to get two batches done - no way three is happening for fancy pops.For our first round, we decided to make three different pops, since we don't start out easy with anything around here. I would recommend starting out simple and then adding more complicated plans once you get the hang of it.
Here are all of our ingredients ready to go:
And our Zoku full and freezing:
![]() |
1. Watermelon Pops with Blueberries
I blended the watermelon and then strained it so it would be just liquid, no pulp. After the stick was seated in the Zoku, I dropped a few blueberries on either side and poured the watermelon juice in to the fill line. Super easy and it came out perfect! My kids devoured it in no time. We didn't feel it needed any sugar or anything as the watermelon was very sweet by itself.2. Strawberry with sliced Strawberry and Banana
In the Vitamix, I blended frozen strawberries with honey and a little water. I recommend not using frozen strawberries, because I ended up having to blend for a long time to get it liquidy enough to pour easily. The Zoku requires very thin liquid so you can't make a thick smoothie and expect to be able to pour it around the stick and the fruit. So thaw your fruit first - it'll be easier to blend anyway.Insert just a couple of pieces of thinly sliced fruit into the Zoku and insert the stick all the way so it's seated properly. We put a sliced strawberry on one side and a couple of slices of banana on the other side. Then pour the strawberry puree in to the fill line.
This one came out great as well!
3. Strawberry Swirled with Yogurt
I used a homemade yogurt that is very thin, so it poured well. If your yogurt is thick, I recommend thinning it with some milk or cream so that it will pour easily. It should be sweet - I used honey to sweeten it since it was plain. For this one, I poured some of the strawberry puree into the Zoku and waited about 2 minutes for it to harden up a little but not all the way. The I poured in some yogurt in and left it for about 3 minutes. Then I filled it the rest of the way with strawberry. I tipped the Zoku back and forth a little so the layers would swirl but not mix completely.
The yogurt took longer to freeze than the fruit only, but it was pretty easy to tell since the stick was wiggly long after we had removed the other two. Once the stick was firm in the pop the whole thing came out easily.
The possibilities are endless! What else should we try in our Zoku?
![]() |
| Smiley Face courtesy of Alexa :) |
Labels:
Breakfast,
Dessert,
Freeze Ahead,
Fruit,
Gluten-Free,
Juice,
Kids,
Sneaky Veggies,
Sugar-Free,
Vegetarian
Italian Brussels Sprouts
I heard about doing this years ago and it's been a favorite ever since I first tried it. I never make it much, since I'm the only one in my family who likes brussels sprouts, but since my parents live close by now and we share a lot of meals together, I make it more often. They love it too.
Italian Brussels Sprouts
Steam brussels sprouts until they are tender but not mushy. You can use fresh or frozen brussels sprouts.
When done, toss in italian dressing and parmesan cheese. Easy!
Labels:
Gluten-Free,
Greens,
Low Carb,
Side,
Sugar-Free,
THM S,
Vegetables,
Vegetarian
Blue Cheese Dip / Dressing
This dip is so good with the Buffalo Chicken Bites, but also delicious on salad. It's become another favorite to rotate through so I don't get sick of salad.
Blue Cheese Dip or Dressing
4 ounces crumbled Blue Cheese (or more)
3/4 cup Mayo
1/2 cup Sour Cream
1Tbsp Apple Cider Vinegar
1 Tbsp Lemon Juice
1 small clove Garlic, minced or 1/4 tsp garlic powder
1/4 tsp salt
1/8 tsp white pepper
Combine all ingredients and refrigerate for at least two hours to let the flavors meld. For dressing you may want to thin with some milk as the dip is very thick.
Labels:
Appetizer,
Dip,
Salad,
Sugar-Free,
THM S,
Vegetarian
Cauliflower "Rice" (Low Carb Alternative)
This is such a good alternative to rice! I love it with stir-fry and don't even miss my once-beloved white rice when I have that meal.
Grate or finely chop a whole head of cauliflower - a food processor comes in very handy for this job, but you can also use a manual grater.
Saute for 4-5 minutes in a wok with a bit of olive oil and garlic. Serve.
Labels:
Asian,
Gluten-Free,
Low Carb,
Side,
Stir Fry,
Sugar-Free,
Vegetables,
Vegetarian
5-minute Strawberry Ice Cream
My kids LOVE to make homemade ice cream in the Vitamix. I usually use stevia instead of sugar. So easy, I always have the
ingredients on hand, and it takes no time at all!
Quick Strawberry Ice Cream
1 10oz pkg frozen Strawberries
1/2 cup Plain Yogurt
Liquid Stevia to taste
Blend frozen strawberries with yogurt. Add stevia to taste - start with about 10 drops and taste, adding 1 drop at a time, mixing and tasting until it's just right.
Quick Strawberry Ice Cream
1 10oz pkg frozen Strawberries
1/2 cup Plain Yogurt
Liquid Stevia to taste
Blend frozen strawberries with yogurt. Add stevia to taste - start with about 10 drops and taste, adding 1 drop at a time, mixing and tasting until it's just right.
Labels:
Dessert,
Fruit,
Gluten-Free,
Ice Cream,
Kids,
Snack,
Sugar-Free,
THM S,
Vegetarian
Sugar Free Chocolate Cupcakes with Homemade Caramel
I volunteered to bring cupcakes to a party for some expectant mom friends, one of whom had gestational diabetes, so I needed a sugar-free option. These cupcakes hit the spot!
Sugar Free Chocolate Cupcakes with Homemade Caramel
Cupakes:
1/2 cup raw Almonds or Pecans, ground (or you can use Almond Meal)
3 Tbsp Cocoa Powder
Pinch Salt
1/4 tsp Baking Powder
1/4 cup Erythritol - I bought Z-sweet from amazon
Mix the above well, then add:
2 T Butter, melted
1 Egg, beaten
1/4 tsp Vanilla
2 T Water as needed
Preheat oven to 350*. Spoon batter into cupcake liners. It's enough for about 6 mini, or 4 regular cupcakes. Bake about 25 minutes or until inserted toothpick comes out clean.
Homemade Caramel with Agave:
1 1/2 cups Agave (I used light)
1/2 cup Heavy Whipping Cream
3 Tbsp Butter
1/8 tsp SaltCombine all ingredients in a heavy saucepan and heat on medium-high until it comes to a boil, stirring well. Reduce heat to medium so it still boils but isn't quite so violent, and cook for 10-12 minutes, stirring frequently. If you cook it for less time, it'll be more of a sauce and you can store it in a jar in the fridge.
Labels:
Candy,
Chocolate,
Dessert,
Gluten-Free,
Sugar-Free
Caribbean Sweet Potato Salad
This salad goes perfectly with Jamaican Jerk Chicken. It's cold and refreshing, colorful and not unhealthy. And it tastes amazing!
Caribbean Sweet Potato Salad
2 white or yellow Potato, peeled and quartered
2 Sweet Potato, peeled and quartered
1 cup Corn (thaw if frozen)
2 Cucumbers, chopped
1 Red Onion, diced
1 Red, Orange or Yellow Bell Pepper, chopped
Dressing:
2 tsp Dijon Mustard
4 Tbsp Lime Juice
6 Tbsp fresh Cilantro, chopped
2-3 clove Garlic, minced
6 Tbsp Olive Oil
3/4 tsp Salt
1/2 tsp Black Pepper
Cook white potatoes in boiling water for 10 minutes, then add sweet potatoes and cook 15 min more. When they are cooked, let cool and chop.
In large bowl, combine dressing ingredients and then add veggies, stirring to coat. Chill for an hour if you can so the flavors can meld. Serve.
Labels:
Gluten-Free,
Leftovers,
Lunch,
Potatoes,
Salad,
Side,
Sugar-Free,
Vegetables,
Vegetarian
Homemade Coconut Milk
I wasn't even a big fan of coconut milk... you know, the stuff that comes in a can. I've used it a few times for recipes (like this and this) but I wouldn't just drink it.
Then my friend shared this link about making your own coconut milk. I had the coconut on hand so I gave it a try. It took 5 minutes and is a.ma.zing.
Step 1. Boil 1 cup of water
Step 2. Put 1/2 cup unsweetened shredded coconut in food processor or blender. I used my vitamix.
Step 3. Pour hot water over coconut.
Step 4. Pulse about 20 times, letting the mixture sit for a couple of seconds in between. (Don't run it continuously)
Step 5. Strain through a fine sieve into a jar. Refrigerate.
You can use the coconut shreds again, with another cup of hot water. The original link says you can make 4 cups of coconut milk with the same shreds.
You can also take the leftover coconut shreds, dehydrate them, and grind them into coconut flour. Thrifty!
As pictured on the original link, the coconut oil will rise to the top and solidify in the refrigerator. I am always trying to get more coconut oil in (I don't like eating it plain and I don't really eat toast, though it's great on toast) so I just stirred it back in and drank it. I also stirred in some vanilla, a few drops of liquid stevia, and about a teaspoon of cocoa powder. Yum!
Labels:
Beverages,
Chocolate,
Coconut,
Gluten-Free,
Sugar-Free,
Vegetarian
The Most Amazing Salad Ever
O.M.G. I just had the best salad of my life. I'm not generally a huge salad fan. I like a diverse salad bar and a yummy dressing, but I don't rave over salads.
Granted, this is my first meal off of a 4-day juice fast, but the other people I shared this salad with also said it was the best salad they had ever had, so maybe I'm not crazy. Maybe.
The key is prepping lots of veggies to go in, and a yummy homemade dressing. I'll post that soon but for now, here are my pretty salad pics. Homemade ranch is also great to use if you already make that. :)
I just chopped some romaine and added baby spinach, and then each of us put whatever veggies we wanted. Yum!
I highly recommend a Spirooli slicer / spiralizer for veggies like carrots and cucumber. It's great for zucchini too which I would have added if I'd had any.
Granted, this is my first meal off of a 4-day juice fast, but the other people I shared this salad with also said it was the best salad they had ever had, so maybe I'm not crazy. Maybe.
The key is prepping lots of veggies to go in, and a yummy homemade dressing. I'll post that soon but for now, here are my pretty salad pics. Homemade ranch is also great to use if you already make that. :)
I just chopped some romaine and added baby spinach, and then each of us put whatever veggies we wanted. Yum!
I highly recommend a Spirooli slicer / spiralizer for veggies like carrots and cucumber. It's great for zucchini too which I would have added if I'd had any.
![]() |
| Spiralized Carrots! Diced Tomatoes! |
![]() |
| Spiralized Cucumber! |
![]() |
| Chopped yellow bell pepper, orange bell pepper, thinly sliced red onion! |
Labels:
Gluten-Free,
Greens,
Lunch,
Salad,
Sugar-Free,
THM S,
Vegetables,
Vegetarian
Vegetable Juice Soup
Lots of juicing going on around here! I really miss having a warm dinner when I do a lot of juicing, so this was the perfect way to feel like I had eaten a warm meal, and it was still all juice!
Vegetable Juice Soup
6-7 medium Tomatoes
2 stalks Celery
2-3 cloves Garlic
7-8 Carrots
Slice of Onion
Juice all together and heat just until warm (so it's not cooked to death, killing all the good enzymes from the fresh juice). Add salt and pepper, basil and oregano as desired.
Labels:
Gluten-Free,
Italian,
Juice,
Lunch,
Main Dish,
Sneaky Veggies,
Soup,
Sugar-Free,
Vegetables,
Vegetarian
Homemade Ranch Dressing

This recipe is a copycat version of Outback's ranch dressing recipe. It's so good! You must try it. :) Even my kids like it
Ranch Dressing
1 cup mayo (regular mayo, I used Kraft - "healthy" mayo like safflower didn't turn out well for me)
1 tsp ranch seasoning (some have msg, so watch for that)
1/4 - 1/2 tsp onion powder
1/4 - 1/2 tsp garlic powder
1/4 - 1/2 tsp paprika
black pepper to taste
red pepper if desired for extra kick!
1/2 - 3/4 cup buttermilk, to desired consistency
Mix all ingredients well.
Labels:
Gluten-Free,
Kids,
Salad,
Sugar-Free,
THM S,
Vegetables,
Vegetarian
Chocolate Cheesecake
Warning: this is RICH! I baked it in a casserole dish without a crust but it would work fine with a crust as well. I recommend almond meal, butter and stevia or erythritol for a crust.
This is a small cake. For a full cheesecake, I would recommend you quadruple this recipe (so use 2 pkgs of cream cheese, 4 eggs, etc).
Chocolate Cheesecake
3 Tbsp Butter
6 Tbsp Cocoa Powder
4 oz Cream Cheese, softened (1/2 package)
4 Tbsp Erythritol
20-25 drops Liquid Stevia
1 tsp Vanilla
1 Egg
Preheat oven to 350* and spray a small oven-proof dish with cooking spray. (Mine is about 4" square.)
Melt butter and remove from heat. Stir in cocoa and cream cheese. Add erythritol one tablespoon at a time, mixing thoroughly as you add each one. Add liquid stevia and vanilla, mix well. Stir in egg and pour mixture into prepared dish. Bake about 20 minutes, then turn off the oven and leave the cheesecake in for about 30 more minutes. The center should be set but wiggle some if you jiggle the dish. Remove from oven and let cool, then refrigerate at least a couple of hours to set. Slice and serve.
If you prefer, you can just use sugar in place of the erythritol and stevia, of course.
Labels:
Cheesecake,
Chocolate,
Dessert,
Gluten-Free,
Low Carb,
Sugar-Free
Sugar Free Mustard Barbecue Sauce
For the first time ever, I made my own pulled pork! Then I wanted some barbecue sauce for it, but since I'm really trying to cut down on sugar, I thought I'd try making my own. I love the mustard style bbq sauce (is this South Carolina barbecue? I can never keep that straight) so here is my recreation. I loved it and so did my husband, who is very picky about his bbq. :)
Sugar Free Mustard Barbecue Sauce
1/4 cup Mustard
1 Tbsp Apple Cider Vinegar
8-10 drops Liquid Stevia or Honey, Agave or other sweetener
1/2 tsp Onion Powder
2-3 tsp Worsecestershire Sauce
The pulled pork couldn't have been easier: simply put a boston butt in the crock pot with a little water and salt and pepper, and cook on low for about 8 hours. Then shred the meat. Done!
Labels:
Crock Pot,
Gluten-Free,
Leftovers,
Low Carb,
Lunch,
Main Dish,
Pork,
Sandwich,
Sugar-Free
Subscribe to:
Posts (Atom)